CARE OF YOUR BOW
Your Black Rhino‘ bow will give you a lifetime of service if cared for properly!
THE MAIN ENEMIES OF ANY LAMINATED BOW ARE HEAT, MOISTURE, AND IMPROPER STRINGING AND STORAGE.
HEAT: Your bow when fabricated was glued together with hand selected materials. It was then cured in an oven at approximately 180 degrees Fahrenheit for several hours. This process is designed to ensure your bow will maintain it integrity under warm conditions. Damage, however could occur to bows when left in a closed vehicle, or direct sun during extremely hot ambient temperatures.
MOISTURE: Your bow has received multiple coats of finish, which will protect your bow under extreme wet conditions. Your bow may receive scratches, which remove the finish. Scratches on the fiberglass will not hurt the bow. Scratches on the edges of the bow limbs and riser, which remove the finish down to bare wood, should be cared for. To prevent moisture penetrating the laminations, treat exposed wood by putting super glue on the scratch thus sealing the wood. The best way to apply super glue is to place a small amount on a cotton swab and wipe over the scratch, this will keep glue from running all over the bow. Waxing the bow to protect it is not necessary, however it will not hurt it. If your bow has a gloss finish and you wish to dull it for hunting, apply a pure past wax over the bow and let it dry. Rub the wax off after hunting.
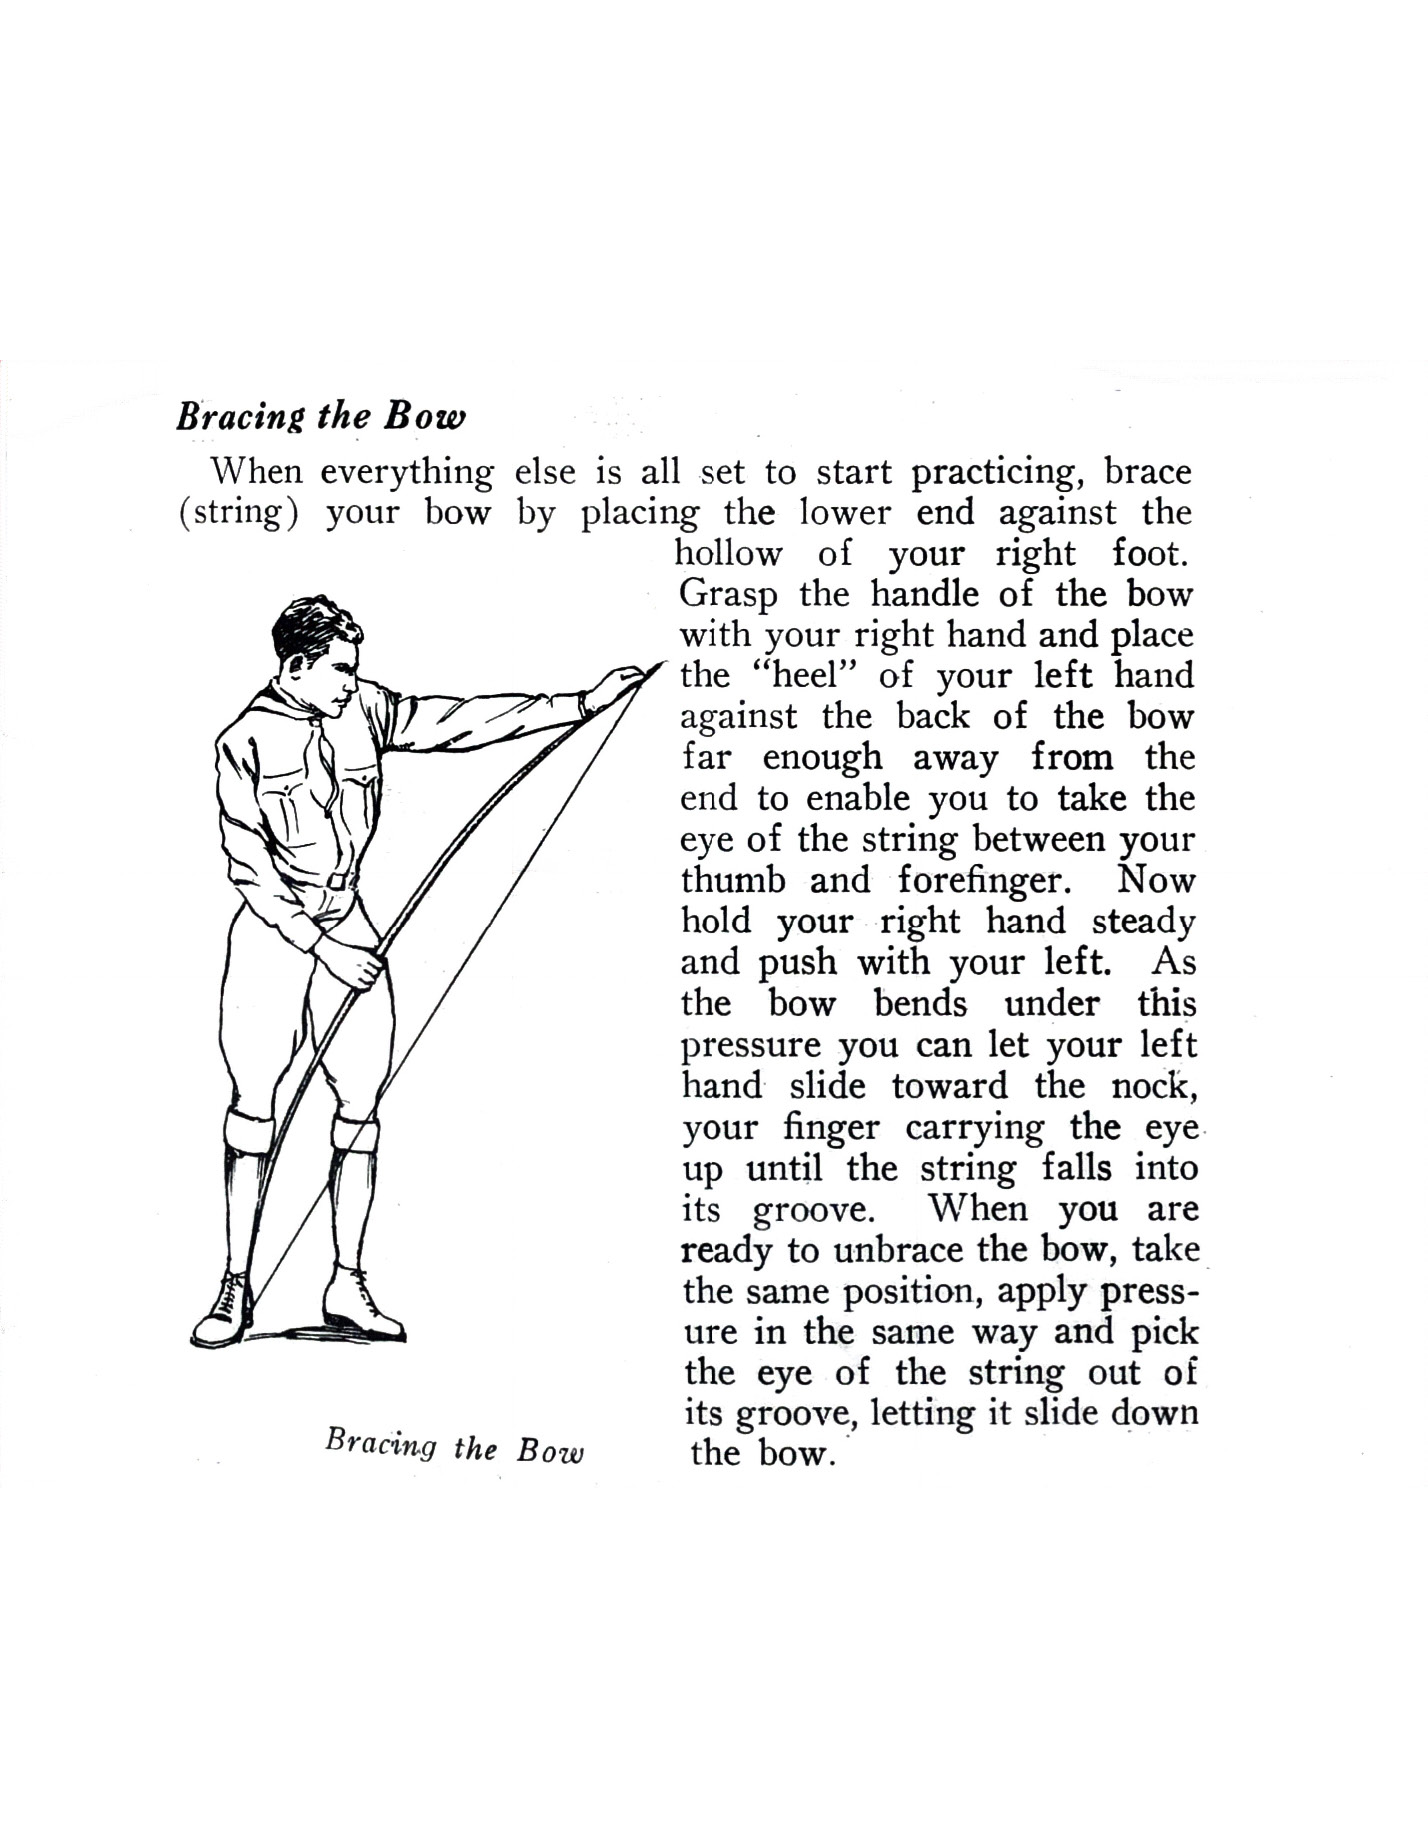
PROPER BRACING: Use a stringer, if possible, when bracing and unstringing your bow. Bracing the bow any other way than with a stringer can be dangerous for the archer and the bow.
![]()
STORAGE OF BOW: Bows should be stored in the unstrung position, preferably laying down flat on a shelf or similar flat surface. Never store a bow in the standing position as this puts to much stress on the bottom limb. If you leave your bow strung you should store it by hanging it horizontally by the string or lay it on it side on a flat surface out of direct sun light .The bow should not be left in the strung position for extended periods.
CARE OF ARROWS
Arrows do not need a lot of special care .The shafts are aluminum, so sealed to protect them from moisture. If a shaft becomes bent or damaged, best to replace the arrow. The nocks may be replaced if damaged with a new nock. The nock may be pulled out, and new inserted. Feathers can become matted or rumpled – feathers may be rejuvenated back to normal by steam. This can be done by rotating the feather over a source of steam such as a tea kettle spout. It does not take much steam to straighten the feathers. It is common to lose a feather through heavy use – these may be glued back on, or replaced. You may purchase additional arrows from us.
CARE OF BOW STRINGS
It is important that the string is inspected for wear prior to each shooting session. The loops of the string will receive the most wear.
The string that comes with your bow is fitted to your bow length. The main strands of the bow string are protected at points of wear by “servings”. To maintain the life of the string, occasionally apply bow string wax (like Bohning Tex-Tite). Watch out for any strands about to break or servings needing repair. You may purchase a new string from us.
Caring for your bow
![]() TUNING THE BOW (TRIAL & ERROR): Since no two shooters shoot alike and no two handcrafted bows are alike, tuning a bow becomes a trial and error process. By following the suggestions below you will be able to tune your bow to your shooting style. If you have trouble please contact us for additional suggestions.
TUNING THE BOW (TRIAL & ERROR): Since no two shooters shoot alike and no two handcrafted bows are alike, tuning a bow becomes a trial and error process. By following the suggestions below you will be able to tune your bow to your shooting style. If you have trouble please contact us for additional suggestions.
BRACE HEIGHT: The brace height of your Black Rhino‘ bow is measured between the edge of the arrow rest and the string; (The edge of the arrow rest closest to the string is a constant regardless of the shape of the handle.) The brace height will vary with each bow and the style of the archer’s shooting. The brace height of your M-58, M-48 and M-42 will probably be between 51/4″ and 61/4″ with a good starting place right in the middle. The brace height of the M-35 will be between 4” and 5” just enough for the feathers to clear the shelf. The way to change the brace height is to unstring the bow and remove the string at the bottom limb and twist or untwist the string. Restring the bow and try shooting it. This is a trial and error process. Once the proper height is determined, note the distance. New strings have to be checked frequently as they stretch changing the brace height of the bow. Improper brace height will affect the quietness of the bow and arrow flight.
NOCKING POINT: The nock point is like brace height it varies with the archer’s shooting style and the arrow spine. Snap a bow square on the string and slide it down until it just touches the shelf measure up _” on the string and use this as a starting point if the arrow is to be placed above the nock set. If arrow is to be placed below the nock set adjust the height allowing for the thickness of the nock set. An improper nock point will cause the arrow to porpoise while in flight. Move the nock set up or down just a slight amount each time until proper arrow flight is achieved.
ARROW SELECTION: The arrow shelf of your bow is cut so the rest has a high radius allowing good feather clearance when shooting off the shelf. It is recommended that only arrows with feathers be used when shooting off the shelf. The plate of your bow is also formed with a radius so you will have good feather clearance. The site window is cut almost to the center of the bow allowing the bow to shoot a variety of different spine arrows. Improper spine arrows will fishtail out of the bow. You may have to experiment with different arrows to find the proper spine for your bow and shooting style. A good place to start is to consult an arrow spine chart if you are shooting aluminum arrows or carbon arrows www.eastonarchery.com. If shooting wood arrows consult the Rose City arrow chart at www.rosecityarchery.com/spine.htm.
![]()
STRINGING THE BOW
Caution should be taken when stringing (bracing) and unstringing a bow. More archers are injured, and more bows ruined during this procedure.
A bow stringer may be used when “bracing” or unstringing the bow. The bow may also be strung manually.
Instructions for stringing the bow manually:
Instructions for using a stringer:
- Place the large loop of the bow string over the top limb allowing the string to slide down the bow limb.
- Place the small loop of the bow string in the string groove of the bottom limb.
- Turn the bow face (belly) down.
- Place the longer cup of the stringer on the lower limb of the bow. The cup should hold the string in the grove.
- Place the smaller cup on the upper limb.
- Place both feet shoulder width apart on the center of the string (At this point the string of the bow is secured on the bottom limb, with the opposite end ready to slide up the top limb. The stringer is now attached at both ends of the bow, with the center of the cord of the stringer hanging down towards the ground).
- Step on the stringer middle. Grip the bow firmly, still with the bow face (belly) of the bow down, raise straight up on the bow. This puts pressure on the bow allowing you to slide the bowstring into the string groove of the top limb.
- Make sure the string is firmly seated in the string grooves of the bow before releasing tension on the stringer.
- Remove the stringer from the bow. Make sure the bow string is securely in the grooves and won’t slip out if you pull the bow string back.
- To unstring the bow follow the same basic procedure.